Ah, web forums. Wonderful. Liberating. Fountains of wisdom. Kindergarten. Give man a paint brush and man shall create great works of art and culture. Give man anonymity and man shall create a drawing of a truly epic penis.
Web forums are actually a great aid to beginners and veterans alike. Most people are very helpful and happy to give advice and opinions. The premier web forum for modular synths has to be www.muffwiggler.com (yes, I know). Trawling around there can easily eat away most of your afternoons if you let it. You can find discussions on everything from synth vanity shots to the inner workings of a particular filter implementation. Many builders of synth modules read and post there and you can even find support forums for some manufacturers hosted on the site.
Another site which can be useful is www.gearslutz.com. I don’t think I have to point out that this synth business is depressingly male-dominated, do I? You do find perhaps an above-average share of muppets at this site but as long as you stay away from topics that attract the tin-foil-hatted crowd — “is analogue better than digital,” or “which is most important, the preamp or the microphone” for example — you can get great help here as well.
So I’ve been studying the MIDI-CV conversion some more and found some references to a company called Expert Sleepers. Untangling what their product was and what it does and what the benefits were took a little time but the end result is that the cost of my interface just doubled. What you don’t know can’t bankrupt you, eh?
I’ll start with the conclusion because I’m sure you’re impatient types, and the rest of it is a bit involved. I’ll be getting an Expert SleepersES3 ADAT-CV converter module instead of a MIDI-CV converter. The ES3 module connects to my computer using ADAT and gives me 8 analogue outputs in the modular. The outputs can be used to get audio as well as CV into the modular. Controlling the ES3 at the computer end is a Rack Extension to Reason called the Silent Way Voice Controller which allows me to send basically anything in Reason to the modular, including gate and CV from modules in the Reason rack. The downside to this is that I need an ADAT interface since my sound card doesn’t have one.
A juicy Reason Rack Extension.
Sound and CV signals are both represented by voltages in an analogue synth. In the Eurorack system audio signals go from -5V to +5V, CV signals go from -2.5V to +8V and gate signals go from 0V to +5V. These are close enough that you can connect an audio output to a CV input and vice-versa without exploding things and this flexibility is one of the beauties of a modular synth.
Expert Sleepers made the (like all great ideas rather obvious in hindsight) observation that since audio and CV signals are so similar, a sound card should be able to act like a CV-generator as well as a sound generator. They have produced a suite of DAW plug-ins called “Silent Way” that generate CV/Gate signals using a sound card which allows users to use spare audio outputs as CV generators. This means that you can control a modular synth (or any CV-controlled instrument) without having to buy a MIDI-CV converter.
In practice there was one problem with this scheme. Since audio consists of an alternating current signal — an AC signal — most audio interfaces are “AC-coupled” which means that they will block any non-alternating signal. They cannot output a constant voltage level. CV signals do not have the same alternating behaviour as audio, they have to maintain an even voltage level, and this means that they cannot be generated by a AC-coupled audio output. There are some audio interfaces that are “DC-coupled” which means that they can output constant voltage levels, and those interfaces worked with the Silent Way plug-ins. Audio outputs also have a tendency to be used for stuff, so it’s perhaps not terribly common that people have 3-4 extra unused audio outputs. To make the Silent Way system easier to use Expert Sleepers have produced a range of hardware modules that can generate DC-signals.
I say “range” and it sounds very structured but the initial impression is one of befuddlement. Expert Sleepers have 12 different modules with some only working as expansion modules that have to be connected to other modules in the range. But once you get your head around how the system works things become much clearer. All modules take an audio signal and does something with it. There are four basic modules that takes audio output from the computer and converts them modular-level voltages. Which one you want depends on the type of audio connection your computer has. The ES-1 takes up to 8 analogue audio inputs, the ES-3 takes 8 channels of digital audio through an ADAT input, and the ES-4 and ES-40 takes 2 channels of digital audio through a coaxial S/PDIF input. Both the ES-4 and the ES-40 multiplexes CV signals on top of the S/PDIF stereo signal. The ES-4 can handle 5 channels of 8-bit signals. The ES-40 doesn’t output anything but works as a base for a range of expansion modules.
To go the other way and bring signals from the modular into the computer there are two options. One is the ES-2 which takes modular-level inputs and converts them to line-level analogue outputs. The other is an expansion module to the ES-3 ADAT interface called ES-6 which converts 6 channels of modular-level signals into ADAT outputs.
There’s a bunch of expansion modules that connect to the base modules and provide extra inputs and outputs. The key thing to realise is that for audio, you want a full resolution signal (usually). For example. 16 bits per sample at 44.1kHz, or 24 bits per sample at 48kHz. But for CV this can be overkill. An 8-bit signal at 44.1kHz might be sufficient for envelopes etcetera (although this is debatable, it is possible to hear stepping effects with 8-bit resolution). For Gate signals it is _definitely_ overkill. A Gate is a binary signal so anything above 1 bit per sample is just pure waste. Expert Sleepers utilise this to get more channels out of the basic audio connections. For example, you can buy the ES-5 module which connects to a ES-3 ADAT module and uses one stereo pair of the 8 available inputs on the ES-3 as a “virtual channel” over which it provides 8 gate channels (and potentially even more with further expansion modules). The “virtual channels” require the audio to pass through a software plug-in for multiplexing while the normal channels can be used to get pure audio inputs into the modular directly.
The upshot of all this is that the Expert Sleepers system is expandable, very flexible and slightly confusing. Just like a modular synth!
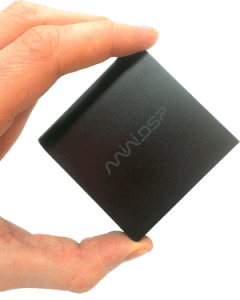
I’m sold on the ES-3 ADAT module. It gives me 8 high-quality audio channels that can be flexibly used as audio, CV or gate outputs from the computer to the modular. The timing of the generated signals are sample-accurate; a lot better than an analogue MIDI-connection would allow. The Silent Way rack extension for Reason seems to make it really easy to use modules in the Reason rack as CV/Gate sources in the analogue modular. If I want a clock signal or an LFO or even an envelope I should be able to generate those in Reason and get them into the modular with a high level of accuracy.
The Expert Sleepers ES-3 ADAT/CV Interface Module.
Finding an affordable audio interface with an ADAT port was a little tricky. ADAT interfaces are mostly present only in the fancier models and those invariably contains posh preamps that I don’t want to pay for since I won’t be using them. I happen to have an old Yamaha O2R digital mixing desk sitting in storage (which is a fancy way of saying that it sits in the shed, under a bed, bringing my rhymin’ skills some cred). It has an abundance of connectivity, including four ADAT ports (two in and two out), as well as a gaggle of preamps. So a simple ADAT in/out module would get me both 8 channels of digital output from the computer to the modular via an ES-3, as well as 8 channels of digital inputs with decent preamps from the O2R.
I finally found the USBStreamer B through this thread at GearSlutz. It is a small, simple and cheap USB-ADAT interface with a TOSLink input and output. Perfect! When Andrew Ostler from Expert Sleepers posted on MuffWiggler that he had tried the USBStreamer B with the ES-3 and it worked I was sold.
The USBStreamer B. Stylish eh?
Getting the ES-3 and the USBStreamer B does have some budgetary implications since this combination is significantly more expensive than a simple MIDI-CV interface. For this reason I’ve decided to sacrifice the LFO (again). I’ll just have to live with the LFOs in Reason for the time being. I’m also going to skip the Ring Modulator in my initial system, it is not really essential and can be added later if I so desire.
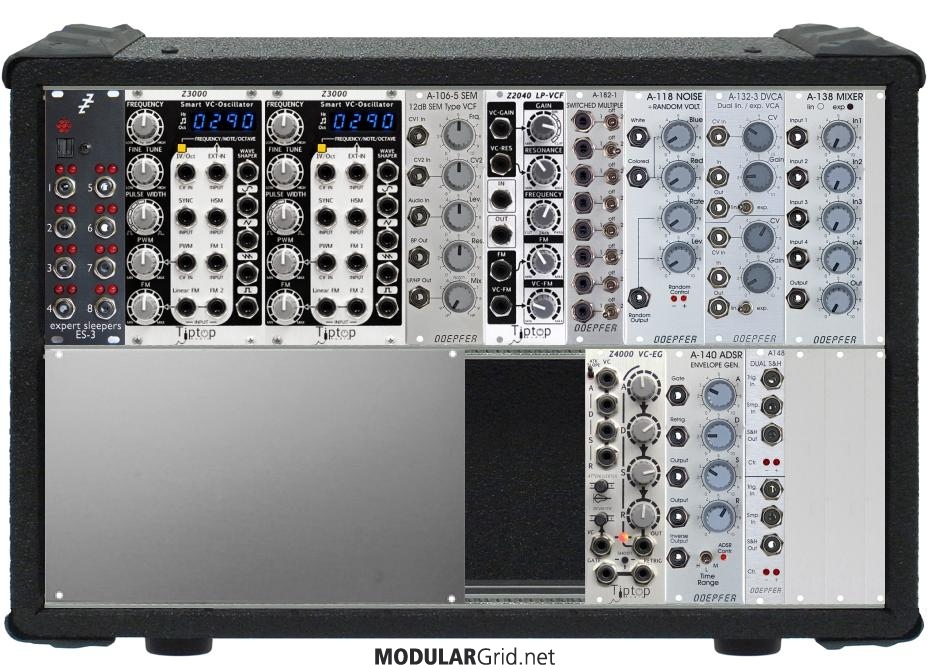
I intended to wait until the attic renovations had finished but that was never really going to happen was it? I had a cold and felt sorry for myself and talked myself into pulling the trigger on my first modular system as comfort. The final system looks like this:
The final configuration. Or the initial configuration, depending on your view…
After checking prices at escapefromnoise.com, thomann.de and www.schneidersladen.de I found out that the prices were pretty much the same at all places but Schneidersladen had everything in stock. They seem to have a pretty good reputation so I put in the order with them. Apart from the modules and the enclosure I also ordered some blanking-panels to protect the innards of the synth from unwanted creatures. And I needed a set of patch-cables as well of course.
You don’t want to get critters in your instrument.
I’m unsure if Schneidersladen prefer to ship the modules mounted in the enclosure (which seems like the safest way) or not, so I provided them with the layout above just in case. Now it’s just a matter of clicking “reload” on the FedEx tracking page every 5 minutes for the next couple of days.
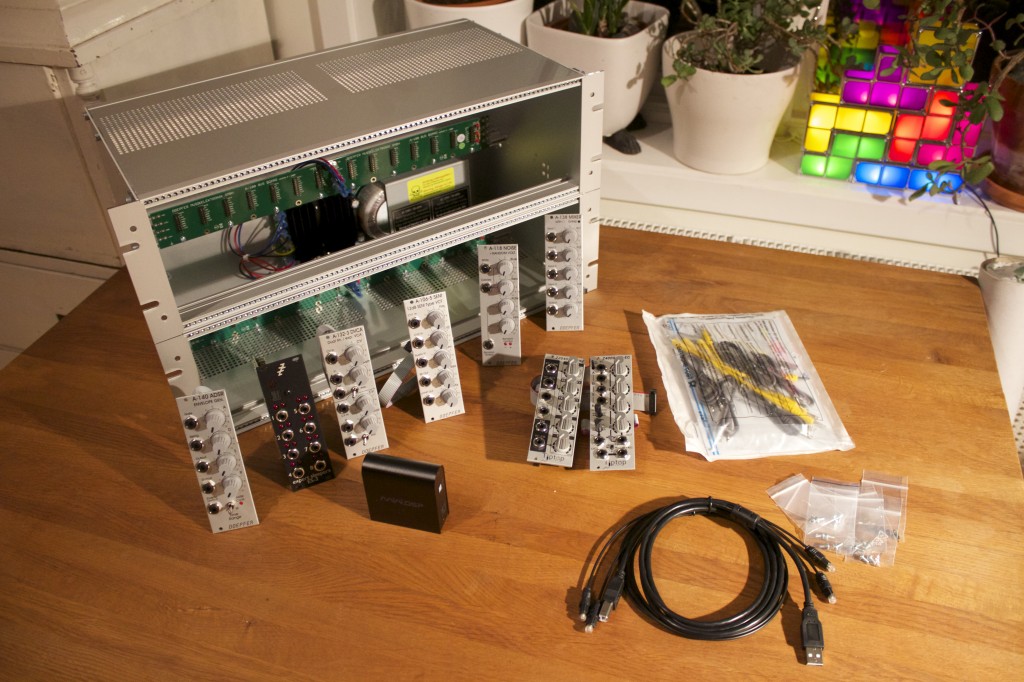
Today I got a partial delivery from Schneidersladen. I’ve gotten everything except the oscillators, the multiple and the S&H modules. I haven’t had time to do anything other than unpack everything. The modules were not mounted in the enclosure, which is perhaps just as well. I’m looking forward to installing them. First impressions? The modules are sooo cute. They are smaller than expected but look really nice.
Some assembly required.
No oscillators are kind of a drag. At least I have the noise generator and a self-oscillating filter available so I can make some noise. Fortunately the USBStreamer arrived on the same day so if everything works as planned then I should be able to put some sounds into the system from Reason as well.
Some assembly provided.
Now if only I had a table to work on and some spare time!
I finally had the time to put the stuff I received together. The good news is that mounting the modules was a piece of cake. Every module arrived with a pre-attached ribbon cable and mounting screws. The A100-G6 enclosure is sturdy and well made with a power switch and an IEC socket on the back. I mounted all the modules and the blanking panels and hooked up the A-138 Mixer output to a small Behringer Eurorack (!) mixer that I had lying around and I was ready to go.
The bad news is that the USBStreamer B did not want to talk to the ES-3 module. The ES-3 would just flicker all its I/O LEDs and the big LED (which I think is a clock sync indicator) didn’t light up. Its hard to tell if the problem lies with the USBStreamer or with the ES-3 but I found one person with a similar problem and he/she could talk to the ES-3 with another ADAT interface so it is tempting to suspect the USBStreamer. Support has been requested and we’ll see how it pans out. This means the only means of triggering anything in the system is through the Z4000 ADSR trigger button. Since the oscillators are on order, testing the delivered modules was more interesting than expected.
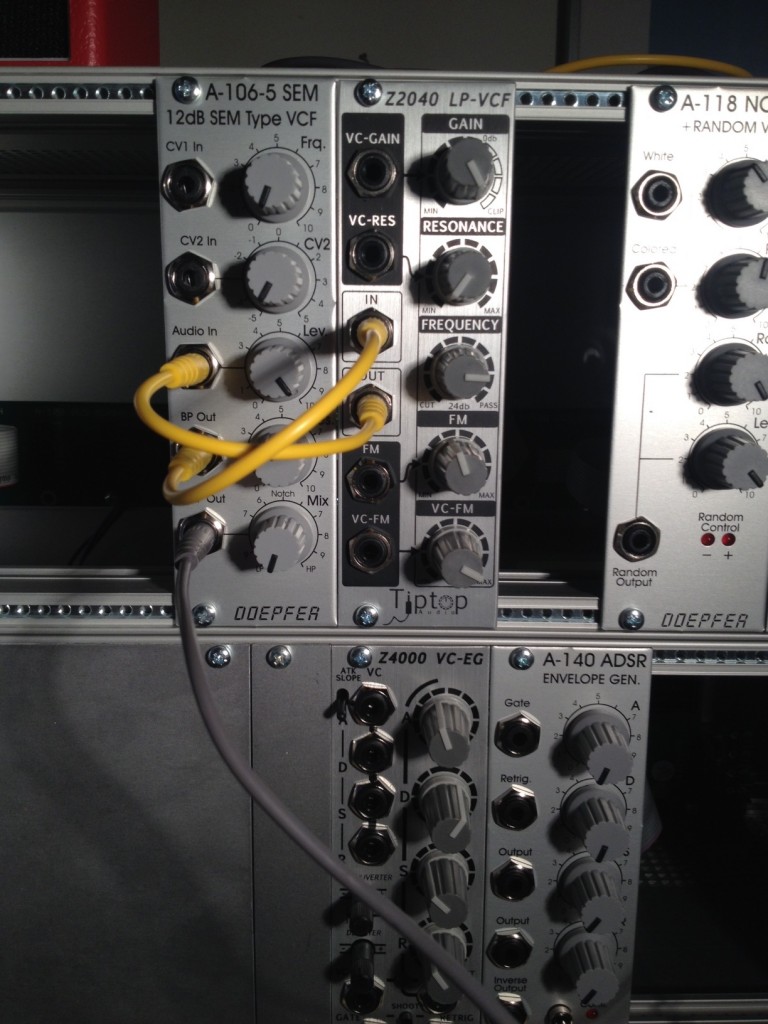
I had to be a little creative to get the system to make some noise but I could wire up a simple patch that used the ADSR envelopes with a VCA and the noise generator to create a simple snare-type sound by using the trigger button on the Z4000 ADSR. The Z2040 filter self-oscillates nicely without any input so I could turn up the resonance to max and use the noise generator low-frequency output to control the frequency. This made the modular bleep and bloop on its own accord which was kind of cute.
Both the multiple and the S&H module were also missing from this first shipment so the patching options are definitely limited. The A-106-5 filter has two outputs, one band-pass filter output and one low-pass/high-pass output. I could use this as a kind of multiple so I could feed back the tone from the Z2040 filter into itself and use the Z2040 gain knob to distort the result to dirty things up a bit.
That turned out to be quite entertaining. With the resulting feedback loop I didn’t even have to have the resonance of the Z2040 turned up and I could control the pitch using the frequency knob on the A-106-5. Limitations begets creativity!
My first-born modular patch. I’m so proud!
I have to say that I could probably spend a weekend playing with this thing, sans oscillators, if only I had the S&H and the multiple. Limitations can be creative but in this case I think I’ll need just a little bit more flexibility.
My first modular advice : Get a multiple. Oscillators are optional. Multiples are not.
My second modular advice : Get twice as many patch cables as you think you’ll need!
I want to integrate my Eurorack modular synth with Reason and have found a pretty neat solution in the Silent Way ES-3 with the Silent Way Voice Controller. I’ve written a little bit about what this does here.
So what I’m aiming for is to be able to route CV/Gate as well as audio signals from any module in the Reason rack out into the analogue modular. I also want to use Reason to monitor and record the audio output from the analogue modular.
I’m using a USBStreamer B USB-ADAT interface which has no other I/O. For this reason I need to monitor and record using a separate sound card and this causes complications since Reason can only use one sound card at a time. Fortunately OSX allows you to create virtual “aggregate” sound cards out of several physical sound cards. This might be possible in Windows too, but I wouldn’t count on it…
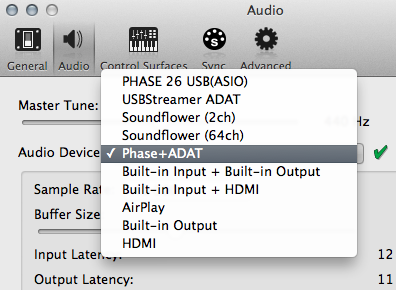
First open the “Audio MIDI Setup” program on your Mac. This is what the Audio Devices window showed on my machine :
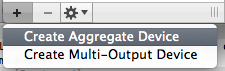
If you click on the + sign in the lower left corner you have the option to create an “Aggregate Device”
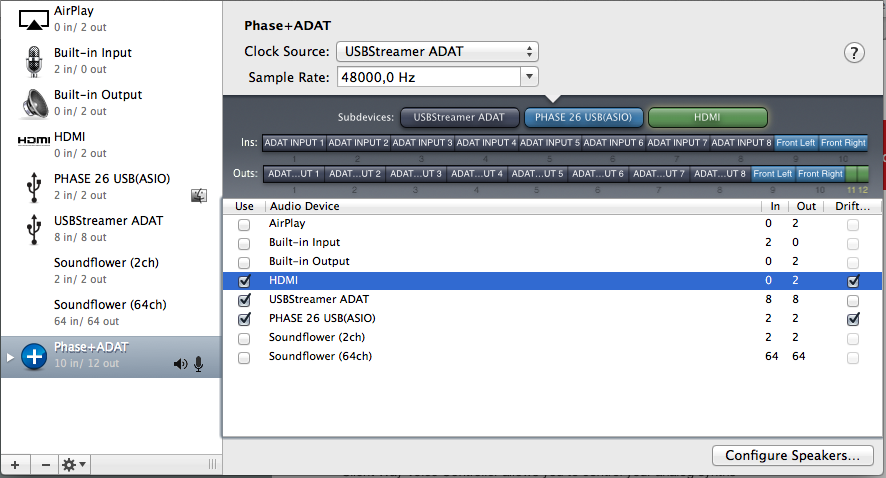
Here you can select which audio devices you want the aggregate device to use. The order in which you select the devices determine how they will be mapped to the input/output channels in the aggregate device; the first device you select will be mapped to the first input/output channels. Reason is pretty flexible so use the order that makes sense to you. First I’ll add the USBStreamer B ADAT interface. Since it has 8 channels and these are numbered 1-8 on the ES-3 panel I think it’ll be easiest if those numbers match the ones in Reason, I’m using a Terratec Phase 26 USB sound card as my main analog interface, my analogue mixer is connected to this interface for recording, so I add that next. Finally I want to monitor using the headphone output on my screen so I add HDMI last. It’s not very high-end but quite convenient since I won’t have to reconnect my headphones if I use the screen for something else (hello Xbox!).
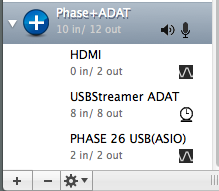
Next I changed the name of the device to “Phase+ADAT” and selected it for audio input and output:
The next step is to set up Reason to use the new aggregate device as its Audio Device:
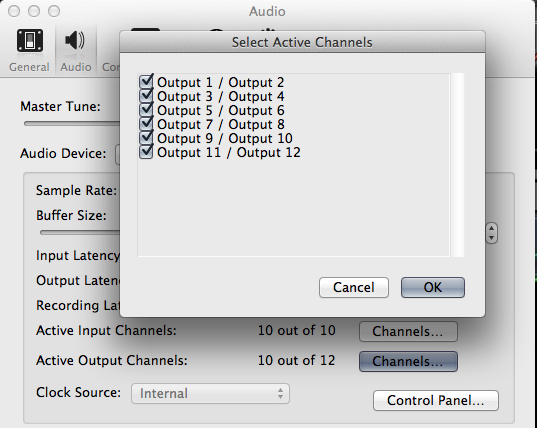
If you have more than 2 channels they may not automatically be active so make sure to enable all the input and output channels that you want to use:
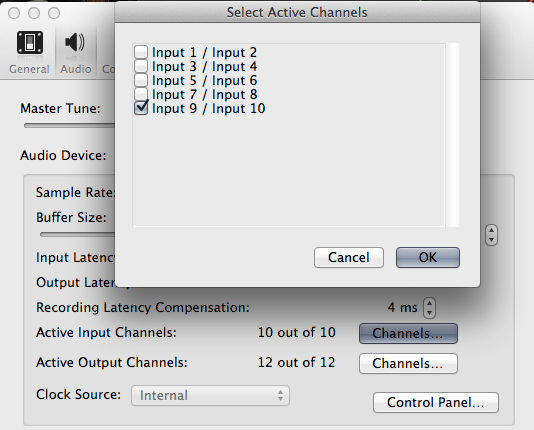
I won’t have anything connected to the ADAT inputs so I’ll disable all those to avoid being fooled into using unconnected channels in the Reason Hardware Interface Section. Remember that I added the ADAT interface first so the first 8 channels of the aggregate device are ADAT channels.
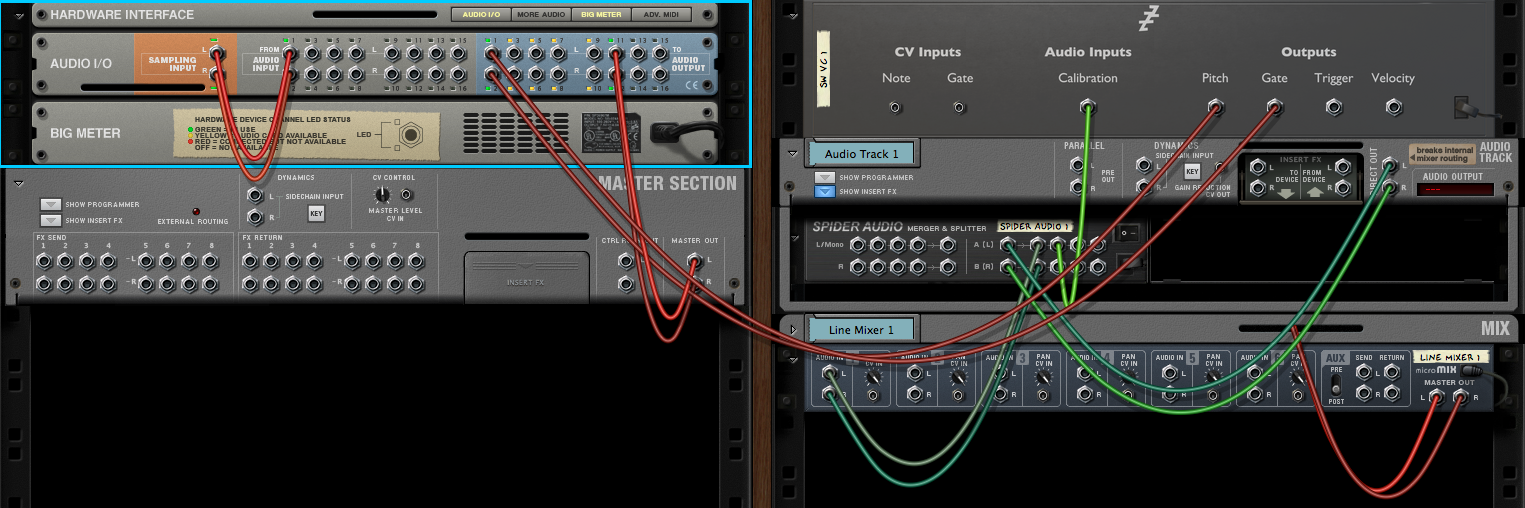
If you go to the Reason rack and locate the Hardware Interface module (top left) and click on the “Audio I/O” button you should now see all your inputs and outputs marked with either a green LED (available and connected) or a yellow LED (available an unconnected). Make sure that the Master Section outputs are connected to the the output pair that you want to use. In my case this is the HDMI output which is channels 9 and 10. If you want to send audio from Reason to the ES-3 then you just connect the audio output that you want to send (from a module directly or from a mix channel device) to an output in the Hardware Interface that is routed to an ADAT-channel.
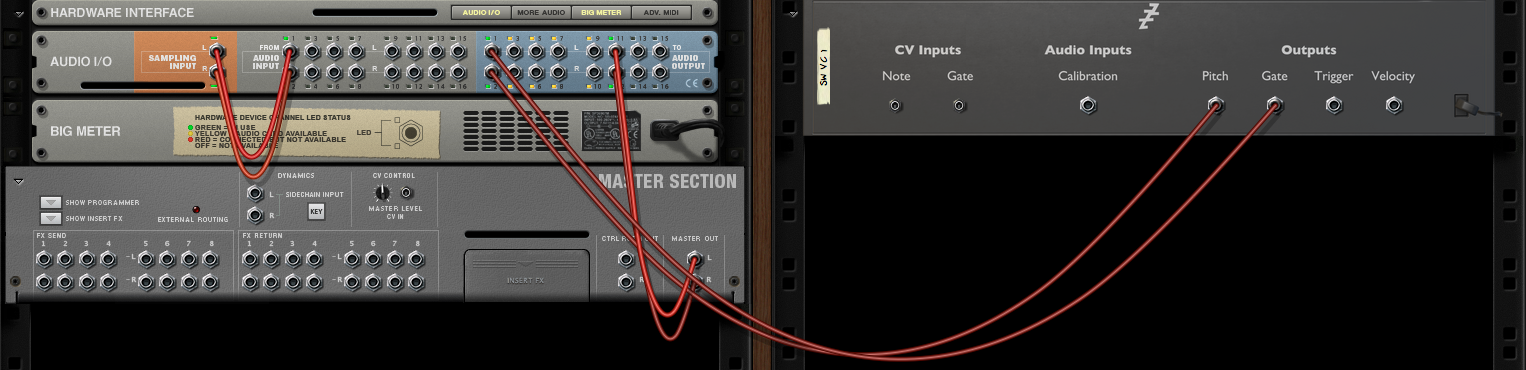
To send CV/Gate to the modular you need to create an instance of the Silent Way Voice Controller rack extension. This is the CV/Gate gateway between the modular synth and Reason. Connect the Pitch and Gate outputs of the Voice Controller to a pair of outputs in the Reason hardware interface section that are routed to a pair of ADAT channels. In my case the ADAT outputs are outputs 1-8 so I picked the first pair: 1 and 2. Now you should be able to send Gate to the modular via the ES-3. CV is not sent unless the Voice Controller has been calibrated.
To calibrate, the Voice Controller listens to the output of the oscillator being calibrated while sending it a sequence of CV values thus enabling it to map CV values to oscillator pitch. For this to happen you need to set the oscillator to generate a simple waveform with a clearly detectable frequency (triangle is recommended by the makers of Silent Way). Connect the oscillator output to a sound card input and then connect the corresponding input in the Reason hardware interface section to the Voice Controller “Calibration” input. If you want to hear the calibration (which can be useful to verify that it actually does something) you have to split the audio input before you send it to the Voice Controller.
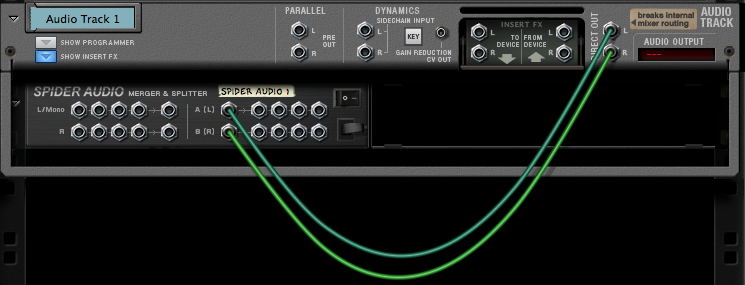
First create an Audio Track and select its Audio Input to be the input from the modular synth (input 9 in my case) :
Next create a Spider Audio Merger & Splitter and connect the Direct Out outputs from the audio track to the splitter input:
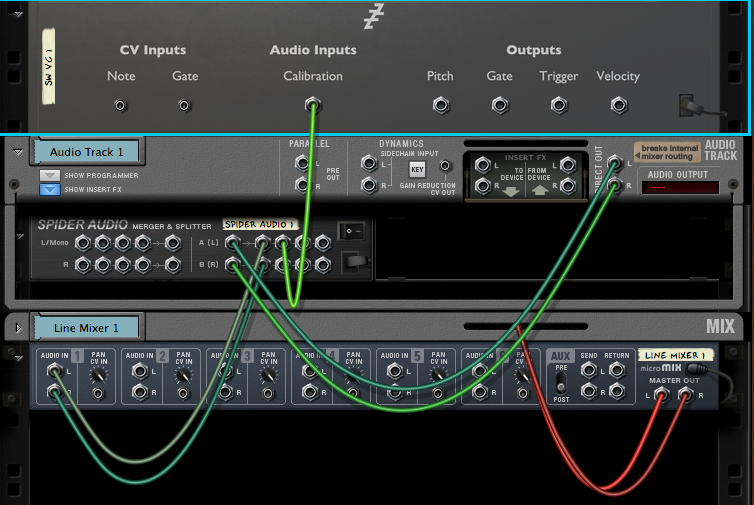
Now we can route the audio from the modular to the Voice Controller and to a new mixer channel for monitoring. Create a Line Mixer 6:2 and connect the split output from the Spider to a channel in the line mixer and to the Voice Controller Calibration input:
Next connect the Pitch and Gate outputs from the Voice Controller to the appropriate outputs (as described above):
Now we’re ready to calibrate. Make sure that monitoring of the modular audio track is enabled. You won’t hear it through that channel because the internal routing is broken by tapping the output into the Spider but you still need the monitoring to be enabled to hear the output on the Line Mixer channel (I don’t know why).
Next you press the V/Oct or the Hz/V calibration button on the Voice Controller to run calibration:
That’s it! Now you can connect whatever you want to the Voice Controller and start making unlistenable IDM!
Routing a Thor oscillator to a modular filter while using the Synchronous modulator to generate CV for the filter cutoff frequency in the modular. Wobble ho!